


Creating Accessible Content in Canvas
Canvas Accessiblity Checker | Images & Graphics | Video & Audio | Text Style & Color | Math | DRC Accom | Files & Docs | Definitions
Creating Canvas Content
Placing content directly in Canvas, rather than uploading documents, is infinitely more accessible for students, and provides efficiencies for instructors as well. Always consider whether the information in your document, such as syllabus information, assignment instructions, or a list of readings, might provide better access displayed on a Canvas page. Students may have trouble opening a document or displaying the content, depending on their device, browser and software. Text content in a Canvas page is immediately accessible and perceivable on any device or computer, and does not require a download. The added benefit for the instructor includes efficiencies in quick access to make updates or revisions, as well as adding or removing content. Of course sometimes you are uploading documents for good reasons, such as providing a printable version of a syllabus or reading.
Rich Content Editor (RCE)
NOTE: Copying text from Microsoft Word into Canvas's Rich Content Editor (RCE) is a bad practice because Word adds hidden, proprietary formatting code that interferes with Canvas's HTML. This "junky" or "rogue" code can cause multiple problems, including formatting issues, accessibility errors, and general instability.
Using Canvas' Styles and List Structures to Create Accessible Content
Canvas has a simple, yet powerful, content editor that is available anytime for creating new content. The Rich Content Editor is used in features that support the editor such as Pages, Announcements, Assignments, Discussions, Quizzes, and Syllabus. The editor appears anytime you create or edit any of the above.

Although clean and streamlined, the Rich Content Editor is sophisticated enough to support embedding any video content, math formula, and other rich media.
Headings
There are three options available for Headings: Header 2 is the first-level heading; Header 3 is the second-level sub-heading, and Header 4 is the third-level sub-heading. Note that Heading 1 is the title of the page. Do not skip headings, always use them in the correct hierarchical order, so students using screen readers understand the order and nesting of the information.
Lists
Ordered lists (numbered) are used to identify steps in a process, such as steps to change the oil in your lawnmower, or a list of tasks to complete for a particular unit in a course. Ordered lists are also sometimes used to identify a particular item, such as a learning outcome in a course. Unordered lists (bullets) are used for items that are related, but do not require completion in a certain order, such as a grocery list, or a list of readings in a course.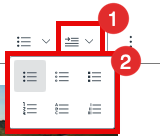
Hyperlinks
Hyperlinks should be descriptive, so those using screen readers know exactly where the link will take them:
Inaccessible hyperlink examples = https://drc.calpoly.edu, or click here
Accessible hyperlink example = Please visit the Cal Poly Disability Resource Center Website to learn more about accessibility services for students with disabilities.
Tables
Students using screen readers can more readily locate and information in a table cell when column headers are set and when alt text or captions are included. Proper headers allow students to associate text or data in a table with the column header. Captions and alt text allow students to scan the full page for tables for a quick preview. Luckily the Canvas editor is set up to easily include these elements in your table.
While adding Tables, begin by selecting the table button in the editor as shown below. Here you can select the number of rows and columns for your table.

After inserting your table, you can select any cell in the table to select the "Table properties" icon on the far left, as shown in the image below.

This opens a pop-up window for further options (see image below):
- Caption (always check the box!)
- Width and height
- Border (default is 1 to show a solid boarder around all cells
- Alignment
- Cell spacing and padding (if your text is too close to the edge of the cell, add "5" in cell padding)

Built-In Accessibility Checker
To ensure your content is fully accessible, use the Check Accessibility feature in the editor, which appears as a small person in a circle at the bottom right of the editor.
![]()
For example, if your table is missing a header row, the accessibility checker will display the issue, and provide you with an option to correct. If your screen is enlarged, you may need to scroll to the right to view the icon.

To learn more about the Canvas built-in Accessibility Checker, review Instructure's support page.
Pictures, Graphics and Charts
Adding images and graphics to your course pages can add meaning, reinforce ideas and make your page more interesting and attractive to students. There are some important considerations to keep in mind when adding images, such as size, color, and adding alternative text, also known as image descriptions, for screen readers. Alternative text (often referred to as alt text) provides screen readers with image descriptions that help students with low vision or blindness connect the image to the text. This reinforces meaning that is readily apparent to learners with full vision. If you are adding a decorative graphic element that does not add meaning, you can select an option in Canvas "description not necessary" and the screen reader will know that the image is simply decorative.
Size: before you upload your image into Canvas. Make sure the width doesn't exceed 600px. Large images can take a long time to load and changing the size (width / hight) in Canvas doesn't make the item smaller in MB.
When you add any images, make sure to add the Alt Text or choose "Decorative image" for images that do not add meaning to the text.

Embed Video & Audio
Always embed video, or add links to your web-based videos, to your Canvas course. Avoid uploading video files, such as MP4s, as video files use lots of storage space and cannot display captions.
Whether you use ZOOM, Screencast-O-Matic, Camtasia, Vimeo, YouTube or Microsoft Stream to store you videos, always link to these or embed them. Audio files are best embedded as well, using the same process. When you embed or link to audio or video content, remember to display closed captions options for videos, and upload a transcript with audio.
Styled & Colored Text
Students with low vision often have difficulties distinguishing letters based on certain font types and font colors, as well as color contrast. While it's fine to use color, it's important to keep certain things in mind, and follow the WCAG 2.0 guidelines.
When you add text to your Canvas page, the default is black text on a white background. The Canvas editor provides options for selecting other font colors and background colors. When using the editor, select the Large letter A icon buttons to display a menu of color choices. Highlight your text, then select the text color and/or background color to apply it to the text.
![]()
The Canvas Check Accessibility feature in the editor allows you to test color contrast on your page. The Check Accessibility icon appears as a small person in a circle on the far right of the editor. If your screen is enlarged, you may need to scroll to the right to view the icon. If your color contrast does not meet requirements, the accessibility checker will display the issue, and provide you with an option to make the correction.
Math Notation
Canvas has an integrated tool for math and science formulas based on LaTeX, the industry standard for academic publication. The LaTeX Math Editor is built into the Rich Content Editor. Canvas also includes the option to create equations and expressions with its graphical point-and-click editor.
The Math Editor can be used for basic mathematical formatting for introductory math courses or for more advanced mathematical text for higher-level math courses. Both students and instructors have access to the editor. Learn more: Canvas Guides: Math Editor
Note: To have characters #, $, %, &, ^, _, {, and } appear in the Rich Content Editor, when your equation is inserted, you must use Advanced View and type a backslash (\) before the character. The ~ character can be inserted through Advanced View by typing \~~. The $ character can be inserted through Basic View by typing \$$.

Once you open the equation editor, a window opens to allow you to create the notation, or switch to Advanced view to type and paste LaTeX.

Make math inclusive for everyone with Microsoft 365
Although this is not a Canvas tool, you can create accessible math in Microsoft and share those DOCX, PPTX, and PDF files with your students.
- OneNote Math Assistant: Allows users to write or type problems, solve for variables, graph functions, and view step-by-step instructions. It supports complex numbers and allows for switching between different solution formats.
- Ink-to-Math: Converts handwritten mathematical equations directly into typed text within OneNote.
- Word Equation Editor: Users can insert complex equations using ALT + = and utilize Math AutoCorrect to quickly input symbols, or use LaTeX syntax.
- Immersive Reader: The Math Assistant can read solutions aloud to aid in understanding.
DRC Accommodations
How to create accommodations for Assignments.
- Edit the activity.
- Scroll down to the bottom, within the Assign Access section...

choose + Assign To and include the new date and time for multiple or a single student.
NOTE: do not replace "Everyone"
How to create accommodations (Moderate) for students in a...
New Quiz Setup | Classic Quiz Setup
New Quiz
- the New Quiz does not need to be Public to set accommodations.
- once the accommodations are set for the first New Quiz, all the additional New Quizzes will have that DRC time. Note: New Quiz does NOT have all the same features as Classic.
New Quiz - Time Limit:
If you have a New Quiz with a Time Limit, you would want to use the Moderate tool to provide accommodations.
Use the Settings > Quiz Time Limit to set how much time students have to take the quiz... 
... and then click on the Moderate tab to give the DRC students extra time.
A (name): allows you to set the moderation (additional time, not limit, multiplier) for all New Quizzes in the course.
B (pencil): allows you to set the time for ALL assignments

- From the Quiz page, click on the Quiz name.
- Scroll down to the Click on the Assign Access section...
..on the top of the page to view the Assign to tray.
For example: this (3) UNTIL time will NOT allow DRC students the extra time to complete their quiz.
Due Date: the date and time that the Quiz is due
Available From: the date and time when the Quiz will become available for students to take the quiz
Until: the date and time when students can no longer take the quiz - You will need to modify the (6) Until to allow for the extra time needed for the DRC students set in the Moderate tab. In this example the highest time is 1.5 hr additional time so instead of 10am, it is 11:30am.

NOTE: All the other students (Everyone) can NOT take longer than 1 hr (exceed time limit) even if the (6) Until is more. Once "Everyone" starts, the timer will begin. - Click the Save button.
- Use the Settings > Quiz Time Limit to set how much time all other students have to take the quiz...
New Quiz - NO time limit:
You did NOT use the time limit option in the Quiz > Settings
This would be used for a quiz that is NOT timed and/or multiple attempts for low states assessments and does NOT need accommodations.
Even with the Start at 8 am and Due 11:59 pm (16 hrs) - you can hide the answers from all the students until after midnight. See the Secure Exam options page.
Classic Quiz
- A Classic Quiz must be Public before you can set accommodations (Moderate This Quiz). Choose a start date/time for the quiz so students do not access it before you are ready.
- You will need to set every Classic Quiz accommodations individually.
- Once one student takes the quiz - you can not create accommodations va Moderate This Quiz.
- You should use the Assign to (+Add) to allow your DRC student a different date/time.
Classic Quiz - Time Limit:
If you have a Classic Quiz with a Time Limit, you would want to use the Moderate This Quiz tool to provide accommodations.
- In the Details tab, set how much time students have to take the quiz...
Set the Until to allow for the accommodations:
The Rutgers page is also very helpful in explaining the requirements and settings.
- From the Public Classic Quiz, click on the Edit button (top).
- Scroll down to the Click on the Assign Access section...
..on the top of the page to view the Assign to tray.
For example: this (3) UNTIL time will NOT allow DRC students the extra time to complete their quiz.Due Date: the date and time that the Quiz is due
Available From: the date and time when the Quiz will become available for students to take the quiz
Until: the date and time when students can no longer take the quizYou will need to modify the (6) Until to allow for the extra time needed for the DRC students set in the Moderate The Quiz. In this example the highest time is 1.5 hr additional time so instead of 10am, it is 11:30am.
NOTE: All the other students (Everyone) can NOT take longer than 1 hr (exceed time limit) even if the (6) Until is more. Once "Everyone" starts, the timer will begin. - and then use the Moderate This Quiz tool to give the DRC students extra time.
- IF you did NOT set Moderate and students started the quiz, use the Assign to and + Assign To blocks for your DRC Students.
NOTE: Do not EDIT the current Assign to settings OR you will LOOSE your grades for those users.

Classic Quiz - NO time limit:
You did NOT use the time limit option in the Classic Quiz Settings
This would be used for a quiz that is NOT timed and/or provides multiple attempts for low states assessments and does NOT need accommodations.

Even with the Start at 8 am and Due 12:00 pm (16 hrs) - you can hide the answers from all the students until after midnight. See the Secure Exam options page.
Files and Documents
Instructors can upload files and documents to share within the course shell. Students who are blind or low vision use screen readers to navigate the document and read content aloud.
- Self-enroll: Creating Accessible Documents
- WebAIM: PowerPoint Accessibility
- WebAIM: Microsoft Word Accessibility
- WebAIM: PDF Accessibility
Documents must include the following for full screen reader access:
- Documents should include accessibility features, such as Word Styles, PDF tags, and accessible PowerPoint features.
- Use descriptive titles that match references from the syllabus
- Inform users when new window or pop-up will occur
- Avoid abbreviations
- Name file with name and extension (ex: BIO131Syllabus.pdf)
- Avoid using file names that repeat weekly. For example, if the students are required to enter information into a "Weekly Journal", name the link in each session based on the week (ex: Week One Journal, Week Two Journal)
When placing files into Canvas as a Discussion Forum attachment, Email attachment, Course link, or Assignment attachment, it is important to name the files properly before attaching them.
CORRECT
- Dog.docx
- theDogRan.docx
- thedogran.docx
- Dog1.docx
- Dog 1.docx
- Dog_1.docx
INCORRECT
Definitions
Assistive Technology: Assistive Technology (AT) refers to a broad spectrum of devices and software that can be helpful to people with disabilities. In online learning, AT typically refers to a range of technology used to access content, interact with course materials, communicate with peers and the instructor, and participate in activities. Examples include screen readers, screen magnifiers, speech recognition, smart pens, and read aloud features.
Alternate means: Demonstrating mastery of course material in a substitute manner. An example would be an oral presentation or written essay in place of a multiple-choice exam.
Auditory aids: Equipment or software items designed to assist a person who is deaf/hard of hearing. Auditory aids allow students with hearing disabilities the same access to information and production as their peers.
Captioning: Video captions display the spoken text on the screen matching the timing of the speech. Captions assists persons who are deaf/hard of hearing, as well as students with learning disabilities. It also assures that important information is clearly conveyed to all students, including English Language Learners and those with limited internet connection. Audio transcripts provide the additional text content for those who cannot hear the audio.
Color Contrast: The difference in luminance between two adjacent colors or overlaid colors (foreground / background). Minimum contrast requirements are WCAG 2.0 level AA requires a contrast ratio of at least 4.5:1 for normal text and 3:1 for large text. There are many tools available to check color contrast, including the web-based WebAIM Color Contrast Checker.
Cooperative Learning: students work together to accomplish shared learning goals. Clear goals, expectations, structure and process are established by the instructor.
Comprehensive syllabus: At minimum, a comprehensive syllabus includes information on the following:
- course description
- course learning outcomes
- text books and required readings
- organization and methods of instruction
- chronological outline of topics and required readings
- explanation of specific assignments, including due dates
- grading information
- office hours and class procedures
- an accessibility statement regarding process for notifying instructor of necessary accommodations
Group discussion: Pooling ideas and experiences of the group on specific tasks or questions.
Guided Notes: Skeleton outlines that contain the main idea and related concepts of lecture with designated spaces for students to complete during lecture. Guided notes use a consistent format and provide maximum student response.
Handout: Paper announcement given to students to supplement oral presentation.
Illustration: A visual representation, comparison, or example that is used to make subject matter easier to understand.
Instructional methods: Methods used by teachers to convey subject material to students. Every method a teacher uses has advantages, disadvantages, and requires some preliminary preparation. There is no one "right" method for teaching a particular lesson, but there are some criteria that pertain to each that can help a teacher make the best decision possible.
Online: Actively using a computer system, rather than paper or other medium, especially with the Internet.
Peer mentoring: Providing students with a peer they can trust, respect, and learn from who is knowledgeable, and interested.
Real-life: While teaching, using examples drawn from actual events or situations. Using real-life examples often makes it easier for a student to "grasp" a new concept.
Study guides: Aid developed by instructor to direct or indicate material to be studied in preparation for test or quiz.
Varied Instructional Strategies: Refers to different instructional techniques which when used often and effectively, usually address individual learning styles. Examples are small group discussion, videotapes, brainstorming, case studies, role-playing, worksheets/surveys, and lectures.
Visual aids: Equipment or software items designed or used to assiste persons with vision impairment. Visual aids allow students with visual disabilities the same access to information and production as their peers.


