


Using Access4All
Access4All (CidiLab's UDOIT) is a Canvas plugin that allows you to check your course for accessibility and provides detailed steps on how to fix inaccessible content.
NOTE:
1) Access4All will only allow you to fix current or future courses. You can not edit courses from past terms.
2) When students request an alternative file, a NEW folder will appear in your course "Alternative Files" to store the files. Please do not edit this folder. These files are created by "Cidiscape Task-Runner".
Please see the Q&A and Webinar schedule from June to August
Check Course Accessibility
Every course has an Access4All course menu.
- Click on the Access4All course menu.
- Click the Scan Now button on the top right.
Scorecard
Once you have scanned your course, the Scorecard provides:
- An overall Course Accessibility Score
- A breakdown of high-to-low impact issues
- A summary of the issues found throughout your course
- An indication of any progress that's been made thus far
- Shortcuts to dive in and start fixing your Canvas content
These Issue Type groups are then sorted into Impact Categories (High, Medium, Low), based on how significantly they affect the user experience.

UFIXIT
UFIXIT will scan and help you fix Canvas' Announcements, Assignments, Class Quizzes, Discussions, Pages, Syllabus Page, and Module URLs. Here, you will review and address the issues found within your Canvas content. This will include issues such as naming links descriptively, providing alt text for images, ensuring accurate color contrast, and checking videos for captions.
In many cases, you can fix the issue within the detailed window. Click on the Review button...

...and follow the instructions provided. For example, the image needs an Alternative Text - Description. But, in some cases, your image is only decorative. 
You can also Filter by file type, formats, issues, reviewed, published, and unused.
NOTE: You may not see some items that need to be fixed if your filter isn't allowing that item to show.

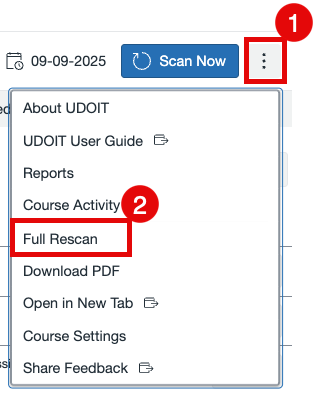
After any change, make sure to perform a Full Rescan to see the changes within your UFIXT and Review Course Files sections.
Review Course Files
Access4All (UDOIT) provides additional tools that can help identify and fix accessibility issues within files stored in your Canvas courses. You can scan and remediate these files, all from directly within the Review Course Files tool.
You can also Filter by file type, formats, issues, reviewed, published, and unused.
NOTE: You may not see some items that need to be fixed if your filter isn't allowing that item to show.
Perform the following actions on files from within the tool:
- Replace file with a Canvas Page & HTML
The action will convert the PDF to a Canvas Page and HTML file. In order to select this option, you will first need to request a Canvas Page (includes HTML file) within the Review Files area. - Replace file with an Auto-tagged PDF
NOTE: Auto-tagging works best for simpler documents. Complex layouts may still require manual remediation.
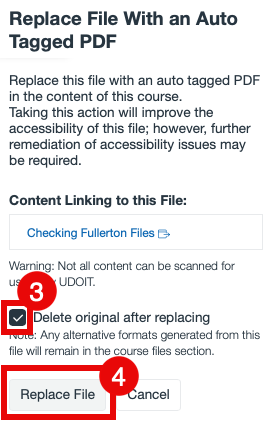
This action will find all the links to the file in the course and replace them with a link to an Auto-tagged PDF version of the file. In order to select this option, you will first need to request an Auto-tagged PDF, which you can do from within the Review Files area.
You’ll also be given a checkbox that allows you to delete the original file (recommended). On the action screen, a preview of the newly generated Auto-tagged PDF is provided, along with a list of content that links to the original file so you can see where it is used in the course.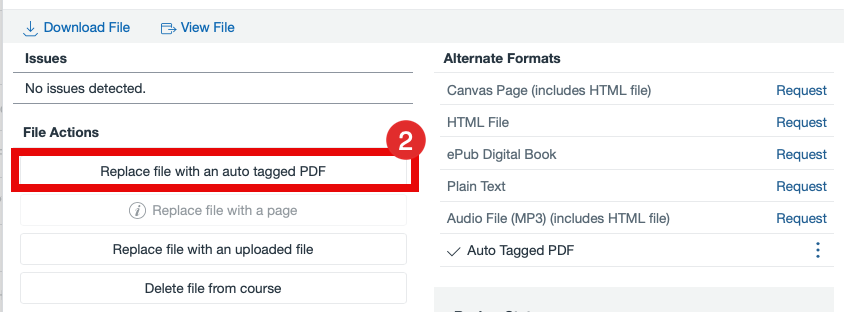
- Replace file with a page
This action will find all the links to the file in the course and replace them with a link to a Canvas page created using an HTML version of the file. To select this option, first request the HTML version from within the Review Files area.
You’ll also be given a checkbox that allows you to delete the original file. On the action screen, a preview of the Web page (HTML) version is provided, along with a list of content that links to the original file. - Replace file with an uploaded file
This action will allow you to update the file on your computer and replace the original file with a more accessible file of the same format that you upload. - Delete file
This will delete the file from the course. You’ll also be reminded on the action screen if there is any course content that links to this file.
After any change, make sure to perform a Full Rescan to see the changes within your UFIXT and Review Course Files sections.
Mark As Reviewed
NOTE: It is not acceptable to use this tool to improve your course score when the item is not accessible. Data is available on which courses and items used this feature, and it is manually reviewed to confirm accuracy.
Access4All allows faculty to mark files as "Reviewed" to show they've been checked for accessibility issues (like missing alt-text, bad color contrast, untagged PDFs) and don't need further action, which stops them from counting toward the course's accessibility score and grading in future scans.
By choosing this option, you are taking responsibility for the review of this item. You are saying it is accessible.

If you would like to check your PDFs for accessibility outside of Access4All, there are options.
B) You can use these tools to scan your PDFs: Allyant, Grackle GO, or VeraPDF.
C) Acrobat Pro (license provided by Cal Poly)
Manual Resolution
NOTE: It is not acceptable to use this tool to improve your course score when the item is not accessible. Data is available on which courses and items used this feature, and it is manually reviewed to confirm accuracy.
Auto captions will be flagged. After manually reviewing the captions, you can select Manual Resolution.
By checking this box, you confirm that you have reviewed this content and determined it to be accessible. This content will be excluded from future scans and will not affect the course's accessibility score. If you make manual accessibility fixes, please click "Scan Now" to update the scan.
I (you) confirm this content has been reviewed and is accessible.
Full Rescan
After any change, make sure to perform a Full Rescan to see the changes within your UFIXT and Review Course Files sections.
Writing Good Descriptions
ALT tag descriptions should be short - less than 100 characters. This description is extremely important when students come across an image that has become suddenly unavailable and when students who rely on a text-to-speech or screen reader program to navigate the web access your course content. In the former case, the alt text is visible to any sighted person. In the latter case, the alt text is read aloud or translated to braille. If you need more than 100 characters to describe this image via the ALT tag, add the instructional text within the page.
Follow these best practices to write good alternative text descriptions for your images:
- Describe the image based on the page context. Convey the full meaning of the image.
- Avoid saying "image of" or "picture of". Screen readers automatically announce images as images.
- Be concise.
- Write narratives for complex images like infographics. Put this narrative on the page immediately following the infographic. Include an anchor link at the top of the page to view the text alternative. See an example of an infographic with a text alternative.
- Avoid images of text. If you can't avoid it, copy the text into the alternative description.
- Say something new. Don't repeat alternative descriptions on the same page. Don't repeat what is already said on the page.
- Identify images that don't represent relevant content as decorative.
What is a decorative image?
An image is decorative when it doesn't add to the information on the page. For example, art work used to separate topics or a photo of someone on the phone when discussing communication skills.
They are valuable in their visual appeal but may not need to be read by screen readers.


